User Guide
Launching EasyTicketScan
After installation, a barcoded ticket icon is available within the apps screen of the device. Click the icon to launch the application.
![]()
When launching EasyTicketScan for the first time you are presented with introduction slides and a Terms and Conditions screen. You must agree with the Terms and Conditions to use EasyTicketScan.
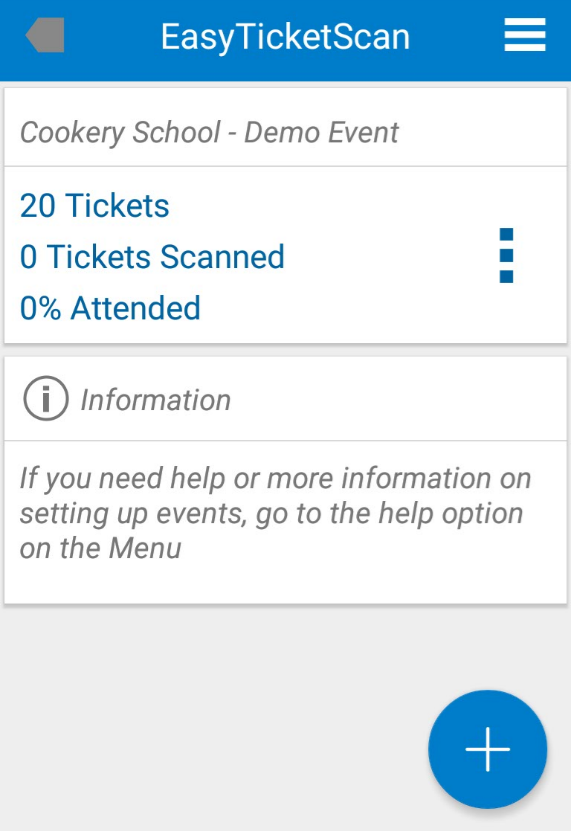
Event List Screen
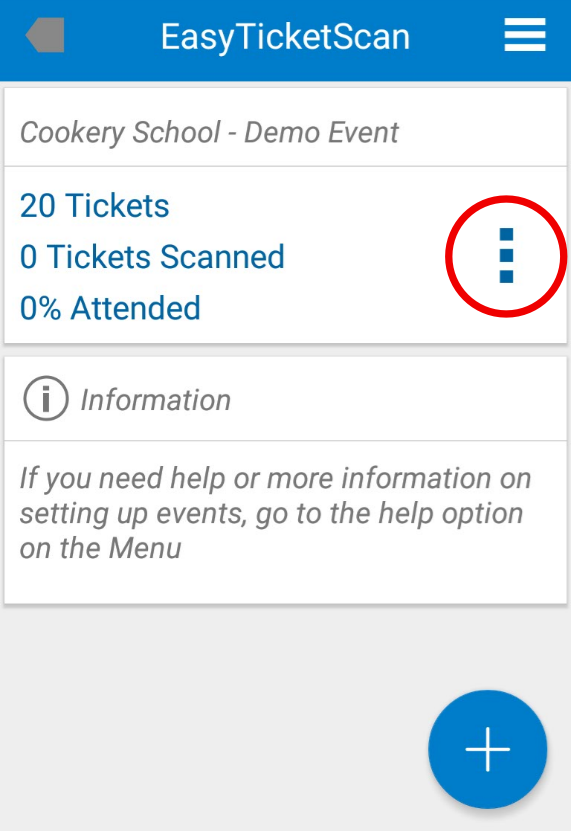
The Event List Screen allows you to manage the EasyTicketScan application. The following actions can be undertaken from this screen:
- Add a new event (via the + icon)
- Overview of existing events
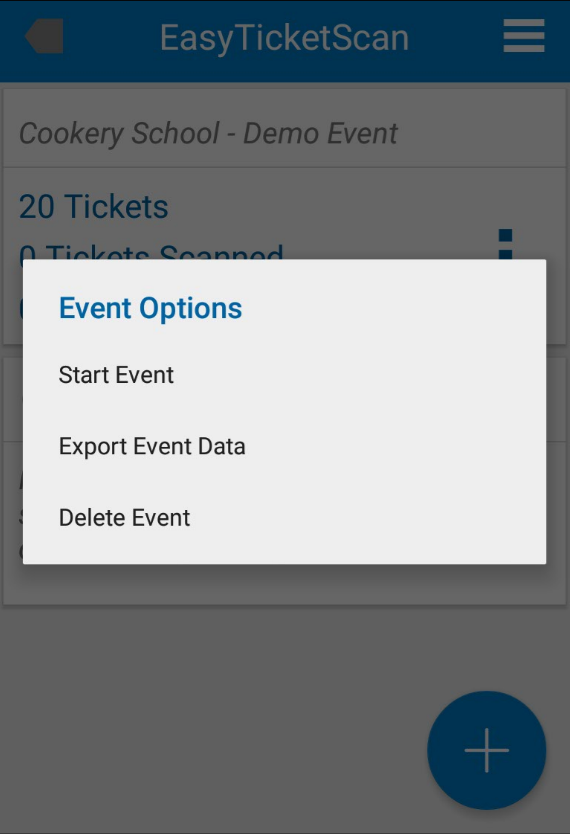
- Select an event to start scanning (via the event options menu - three squares)
- Export an event (via the event options menu)
- Delete an event (via the event options menu)
- Access the Main Menu (via the menu icon)
This screen is intended for administrators and not general users. It is possible to password protect it from the system settings.
Adding a new Event
To add a new event, press the “Add New Event” button on the Event List Screen.

Selecting a Ticket File Data Source
It is possible to upload ticket data from a local file or from your Google Drive. Other Cloud Storage providers may also work.
The demo version contains a built-in ticket data file which can be used with our demo barcodes.
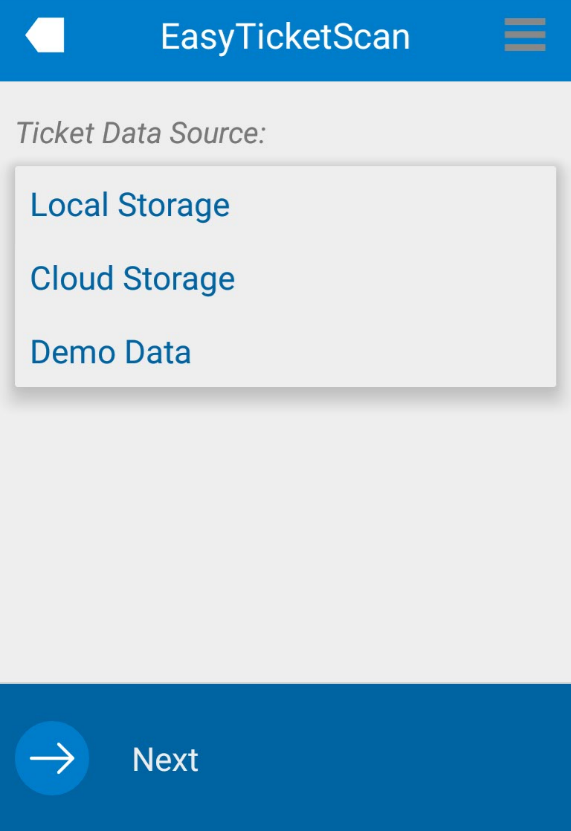
Select from the drop down where your ticket file has been saved and press “Next”, the following options are available:
| Data Source | Description | Next action |
|---|---|---|
| Local Storage | Files on the devices in-built local storage | Opens the local storage explorer on the device, user navigates to file and selects |
| Cloud Storage | Files saved in Cloud storage E.g. Google Drive | Opens Cloud storage drives found on the device, user navigates to file and selects |
| Demo Data | Only available in the Demo version of EasyTicketScan, which contains a pre-loaded ticket data file - see Demo Data section for more detailed information | Moves directly to the File Selected screen |
See the Importing Ticket Data section for detailed information about ticket file formats.
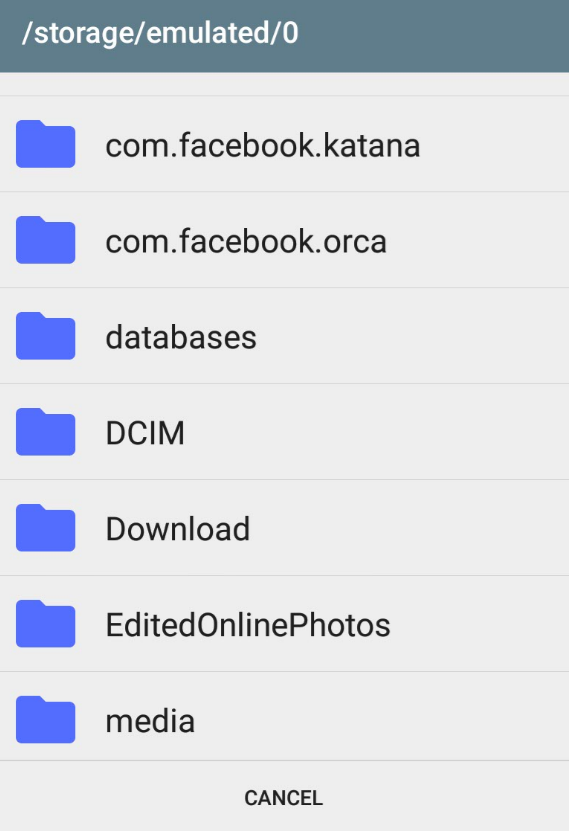
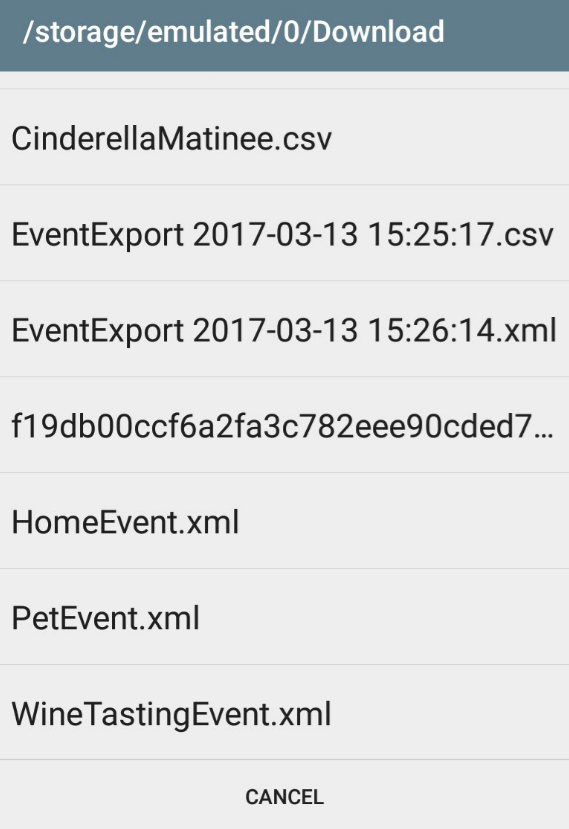
Selecting a Local Ticket File
If your ticket file has been copied across to your device you can select it from the saved folder.
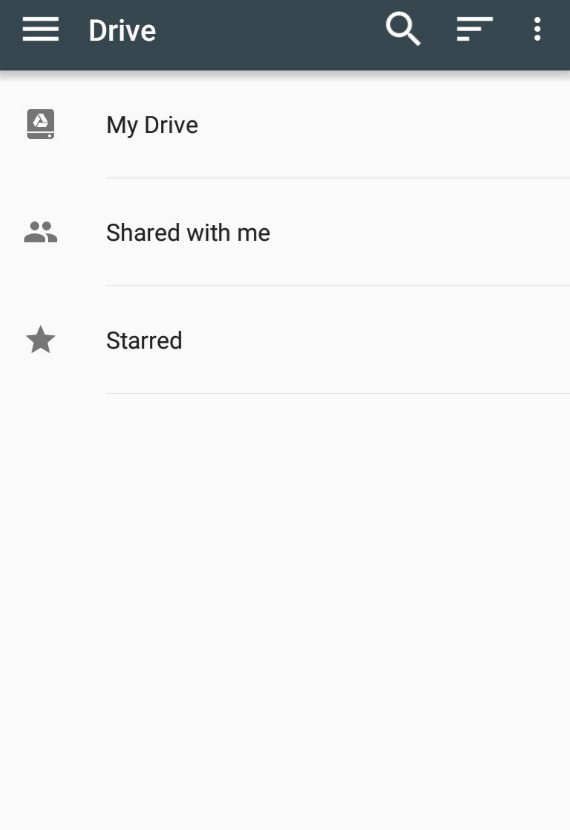
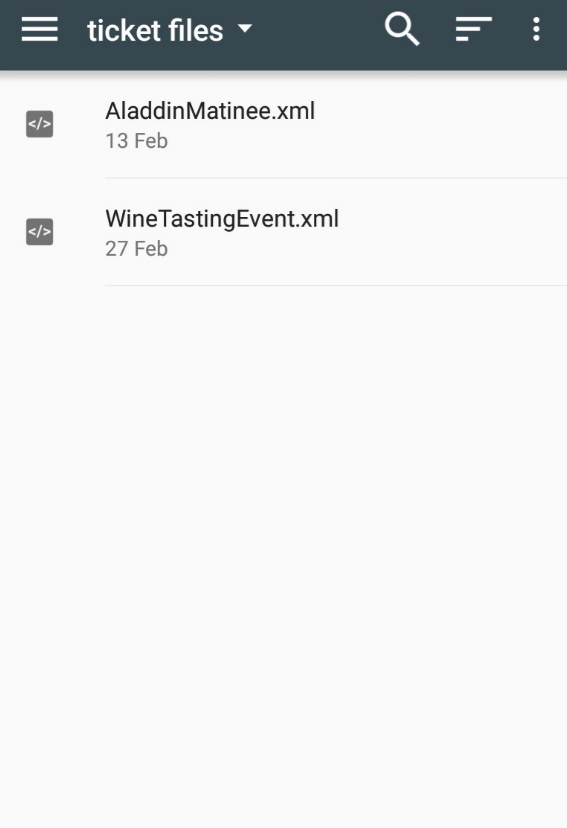
Selecting a Ticket File from Cloud Storage
Android’s Storage Access Framework provides an interface allowing users to browse, select, delete and create files hosted by storage services also referred to as document providers.
Google Drive is installed as default on most Android devices. You must configure a Cloud Storage provider before installing EasyTicketScan. If a provider doesn’t show then it is not compatible with Storage Access Framework. Officially EasyTicketScan only supports Google Drive although other providers may work.
Selecting Demo Data
Please click here for details about the demo data file.
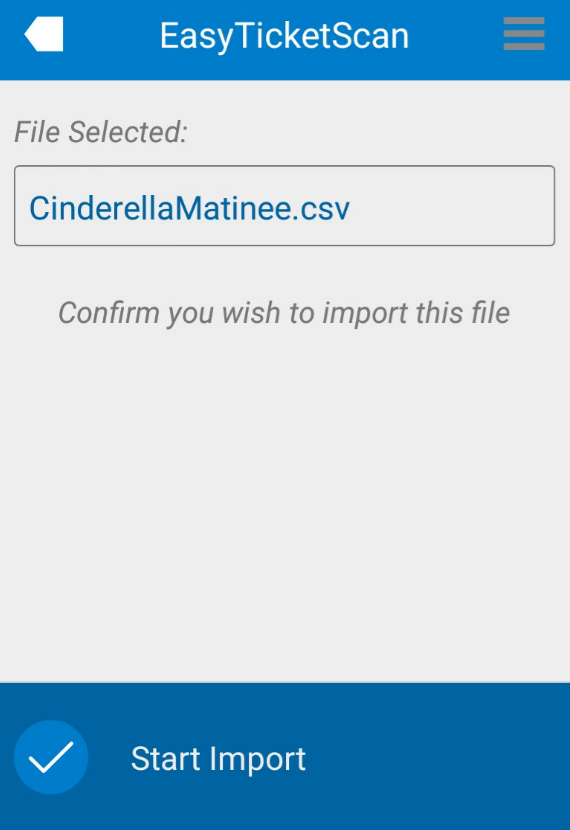
File Selected
You must confirm that you have selected the correct file before it is imported.
If the file is correct then press the “Start Import” button.
Whilst the file is being imported a progress screen is displayed.
If there is an issue importing the file an alert is displayed.
After the file imports successfully, the Event List screen is shown with the new Event in the list.
Starting an Event
On the Event List screen find the event you want to start and press the Event options menu button.

Select the “Start Event” option. The Ticket Scanning screen is displayed.
Ticket Scanning Screen
This screen is used to scan the tickets for validity, it highlights to the user if a ticket is valid, invalid or already scanned. This screen also shows a summary of event information.
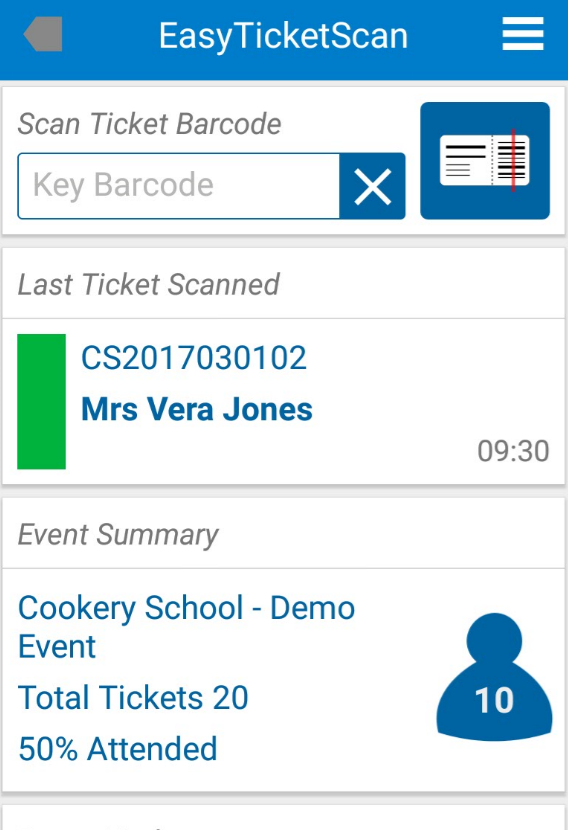
The screen is split into the following sections:
- Scan Ticket Barcode
- Last Ticket Scanned Information
- Event Summary
- Demo Mode section (only in demo version)
Scanning Tickets
It is possible to scan a ticket barcode via the following methods:
- With a built-in laser/imaging device. I.e. Zebra/Honeywell Enterprise Device.
- Using the devices built in Camera
- External Bluetooth scanner
- Manually keyed into the ticket barcode input box
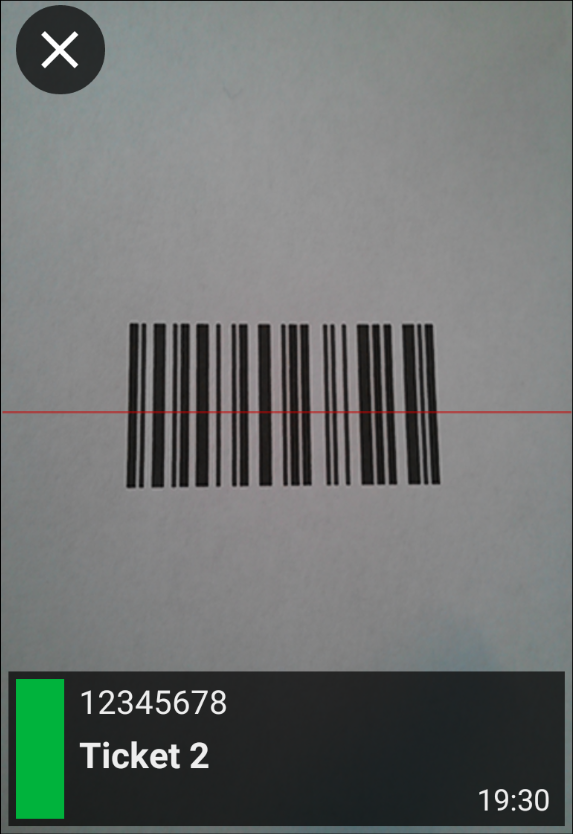
Triggering the camera scanner
Press the Ticket Scan button to open the Camera Scanner screen.

The Camera Scanner screen allows continuous scanning of ticket barcodes.
It also shows the last ticket scanned details at the bottom of the screen.
The screen automatically closes after a period of inactivity or if the user presses the Close (X) button.
The Camera screen only recognises the following barcode types: Code 39, Code 128 and QR Codes. The QR Code format is recommended when using the Camera Scanner as it is quicker at decoding and less prone to partial decodes. The quality of scanning is directly related to the quality of the camera hardware. Please use the free demo version to check that your barcodes scan reliably.
Triggering the laser/imaging scanner
Triggering a laser or imaging scanner differs from device to device but generally involves pressing a hardware Scan button. Please consult your device’s user guide for more information.
You must configure your device’s Data Wedge software to append a Carriage Return character to the end of the barcode string. This is used by EasyTicketScan to detect the end of the ticket barcode entry. This is not necessary when using a Zebra device as the Data Wedge software sends details of the scan directly to EasyTicketScan.
On Zebra devices, the Camera Scan button soft triggers the built in laser/imaging scanning rather than opening the Camera Scanning Screen.
Successful/Unsuccessful scans
When a scan is successful a positive chime is emitted.
If a scan is unsuccessful a negative chime is emitted and an alert displayed to highlight the reason for failure.
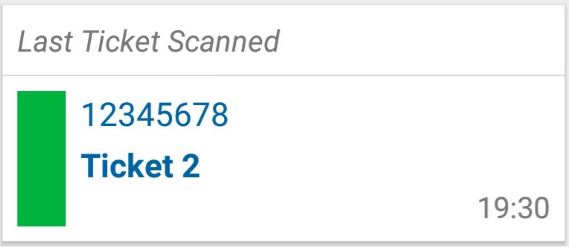
Last Ticket Scanned Section
This section shows when a ticket has been scanned and contains the following data:
| Information | Description |
|---|---|
| Colour bar | Shows green if the last ticket was a successful scan and red if it was unsuccessful |
| Ticket number | The ticket/barcode number of the ticket scanned |
| Additional information | If the scan was successful it shows the information included in the “text” field of the import. If the scan was unsuccessful it shows why e.g. Unknown ticket, Not valid at this time |
| Time | The time the ticket was scanned |
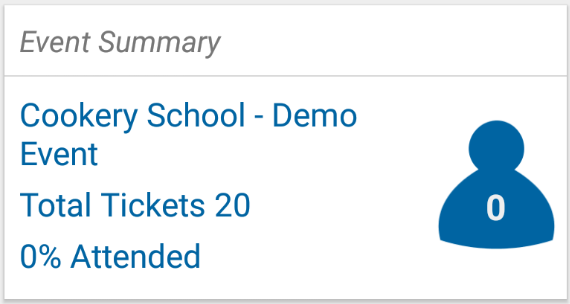
Event Summary Section
The Event Summary provides up to date statistics of the current Event:
| Information | Description |
|---|---|
| Event Name | The name of the event being scanned |
| Total Tickets | Total number of tickets in this event |
| % Attended | The number of tickets scanned as a percentage of the total tickets |
| People scanned icon | The number of tickets that have been scanned |
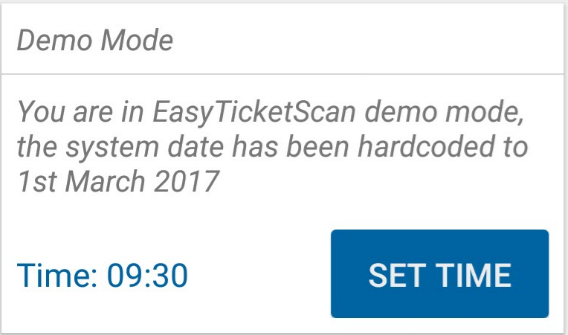
Demo Mode Section
This section only shows if the Demo data is being used. When using the demo data, the date and time used to mark when the ticket was scanned is hardcoded. By pressing the set time button the system time can be changed if required.
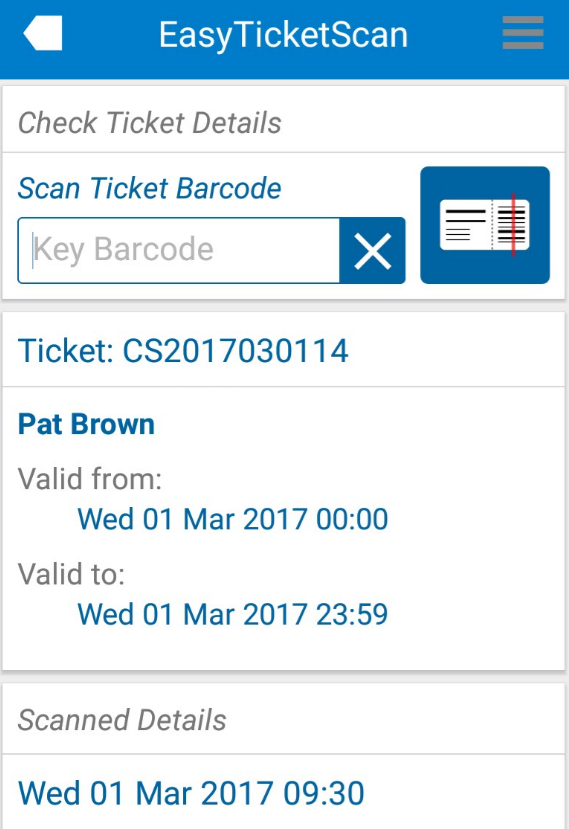
Check Ticket Details Screen
The Check Ticket Details Screen is accessed via the Ticket Scanning Screen’s menu. It is used to check the details of a ticket, it is made up of the following sections:
| Section | Description |
|---|---|
| Scan Ticket Barcode | The same logic as the Scan Ticket Details screen. If an unknown ticket is entered an alert is displayed. |
| Ticket details | Displays the Ticket number and any information included against this ticket in the “text” field of the import. It also includes the start and end date and time for the ticket if included |
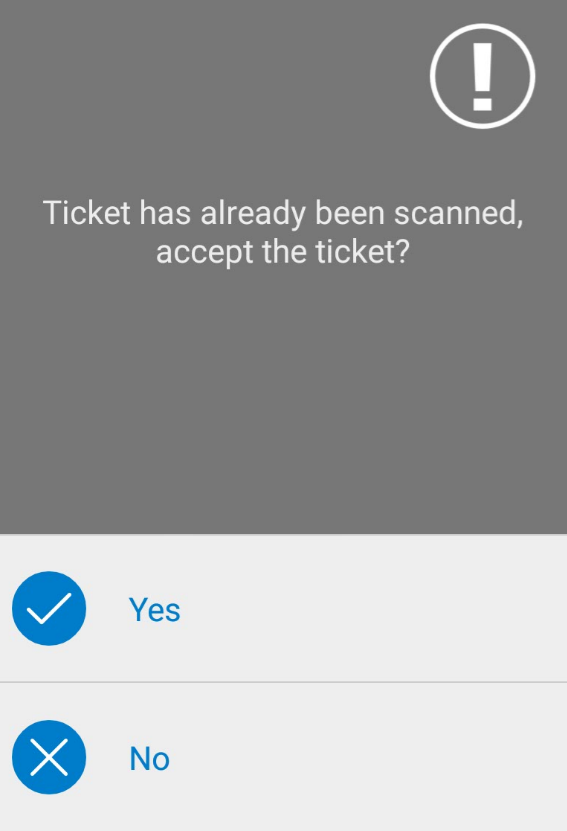
| Scanned details | If the ticket has been scanned the date and time shows in this section. If the ticket has been scanned and accepted more than once each scan is captured. |
Finishing An Event
To finish an event and return to the Event List Screen select “Finish Event” from the Ticket Scanning screen’s menu.
It is possible to prevent a user from finishing an event by setting a password. Please see the Finish Event Password section. This is useful where the device is handed to mobile workers for ticket scanning.
Exporting An Event
An event can be exported by finding the event on the Event List Screen and selecting the “Export Event Data” option from the options menu.
For detailed instructions on the format of exported ticket files, see the specific Exporting Ticket Data section
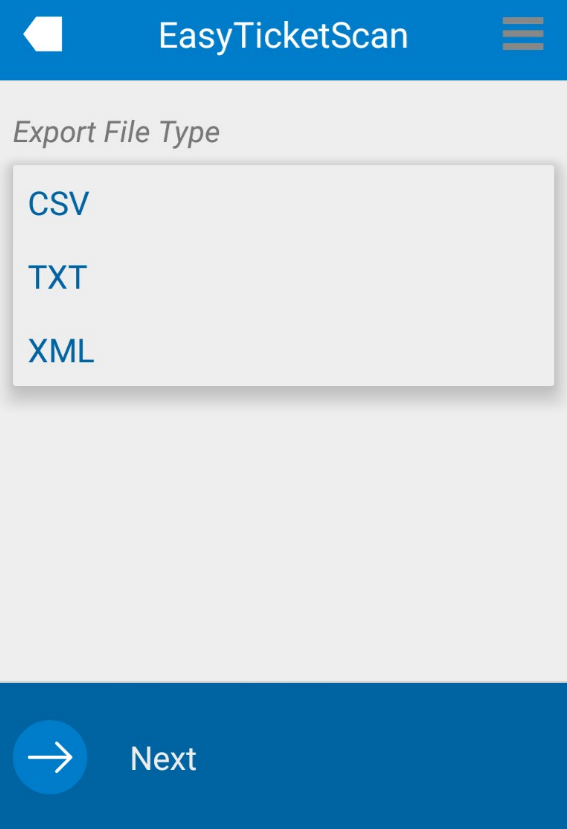
Export File Type
Select from the drop down what format the exported file is to be saved as. The following options are available:
| Data Source | Description |
|---|---|
| CSV | Comma-separated values |
| TXT | Text only file |
| XML | Extensible Markup Language |
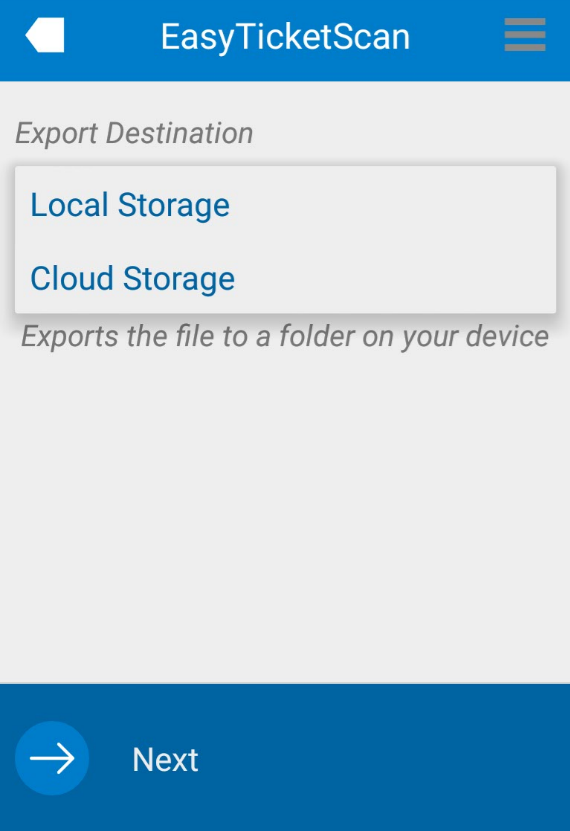
Export Destination
Select from the drop down where the file should be saved, the following options are available:
| Data Source | Description | Next action |
|---|---|---|
| Local Storage | Saved on the devices in-built local storage | Opens the local storage explorer on the device, user navigates to destination then taps the disk icon |
| Cloud Storage | Saved in Cloud storage E.g. Google Drive | Opens the Cloud storage drive found on the device, user navigates to destination and taps “SAVE” |
The export filename defaults to “EventExport” followed by the current date and time in a YYYY-MM-DD hh:mm:ss format. Tapping on the filename when it’s displayed brings up the keyboard and an alternate filename can be entered if required.
Once a destination has been chosen for the file, the application attempts the export.
Whilst the file is being exported a progress screen is displayed.
If the file is successfully exported the application returns to the Event List screen. Please note that exporting the file does NOT remove it from the device, this is only actioned under the delete event option.
If the application is unable to export the file an alert is displayed.
Deleting an Event
An event can be deleted by finding the event on the Event List Screen and selecting the “Delete Event” option from the options menu.
This option should only be used once all data has been exported and verified. The event is deleted and cannot be recovered.
Options Menu
The options menu is available by the pressing the menu button on the Event List Screen.
| Option | Description |
|---|---|
| Settings | Change system settings |
| Upgrade | This option only shows when running the Demo version of the app and links to the full version of EasyTicketScan in the Play store |
| Help | EasyTicketScan documentation |
| Information | EasyTicketScan version, licensing and End User License Agreement information |
Settings Menu
Orientation
By default, EasyTicketScan always displays in portrait orientation. This prevents the device from auto rotating the screen. You can use this screen to change this behaviour.
Select the orientation option you require from the drop-down list and confirm your changes by tapping the action bar at the bottom of the screen.
Finish Event Password
There is the option to limit access to the Event List screen by setting a password. If a password is set it is requested when “Finish Event” is selected via the menu icon on the Ticket Scanning screen.
To set a password, type the password of choice into the input box and tap the action bar at the bottom of the screen. The password needs to be re-entered for confirmation and the action bar tapped to save the password.
If the passwords do not match an alert is shown.
To remove a previously set password, leave the password input box blank and tap the action bar, repeating again when asked to confirm that a blank password is to be set.
General Information
Header Bar
At the top of most screens a header bar is displayed, it has three sections as follows:
- Back button which goes to the previous screen - left facing arrow
- The application name
- Menu button which opens the menu screen if available - three bars
If the icons are white they are enabled, if they show grey they are disabled.

Action Bar
When a screen requires an action from the user e.g. confirmation, an action bar is displayed at the bottom of the screen showing the options. The user is required to select/confirm an option before continuing.

Information Section
Throughout the application there are information sections, identifiable by their “i” icon. These help guide the user through the application.
Alerts
If an attempted action fails e.g. unable to load a ticket file or an invalid ticket is scanned, the application emits an alert to inform the user.